Is anybody looking?

Wednesday, March 14, 2012

New system on the horizon...

      Okay, so I am coming into a bit of money I didn't expect. Which is great! Sadly though as is the story of my life... it enough to get a good start but not enough to get it done. Which means I will have to do things in piece meal again.

      But that's not the reason for this post! No siree Bob! This post is to talk about a new system I will be building for the cabin and eventually moving to the main house. If you have read my other posts you already know what I have in place right now. But this new system will be a 24VDC system (increase efficiency of the system overall) with a custom fridge and DC water heating.

      I have been shopping around for a DC refrigerator for some time now and while I have found some great fridges out there... I can't afford them! So in my searches I found this link:


      And since I have an AC fridge already as well as the majority of the materials I need to build with... why not? The great thing is I have an HVAC technician that is going to help me with sizing the refrigeration components that work with 24VDC current. The fridge I have is a 19CuFt. Kenmore so I have to have enough capacity to maintain 35F. And that's where my friend / co-worker will come in. right now I am looking at a Dan Foss compressor (actually 2 of them) one will be set for lead and the other as lag.

      More on the refrigeration set up in a bit, I want to focus on the power side of the house. So to power this up I will be investing in two Suntech STP180S-24/Adb+ 180W 24V Solar Panels from the AltE store. That will give me 360W of power production there. The next element will be a 600W 24V 7 Blade Raptor Wind Turbine. Since where I live is literally the prime place for both solar and wind it's a good fit.

      The batteries will be Trojan T105 6V 225AH and I will have a total of 8 set up in series / parallel so I will have a total of 450AH capacity. And as a load diverter as well as a more efficient means of heating water I will use a 600W 24VDC hot water heating element. The wind turbine and the heating element will be purchased from Missouri Wind and Sun and the batteries will also be purchased from the AltE store.

      How the system will be set up is pretty simple. The wind turbine and solar panels will be installed to charge the batteries, the how water element will work as a load diverter in the event I am producing more power than the batteries can handle. This will prevent the batteries from being damaged. So my load characteristics will change.

      On top of my existing loads I will be adding my custom made refrigerator and a hot water heating element. But I will also be adding to my charging capacity with the wind turbine. Which is perfect as during the winter months solar is a bit of a bust. But during the summer it's perfect and wind is minimal. Now the whole reason for using DC on the refrigeration and water heater is to save money long term. Right now our current refrigerator is propane fired and only about 7CuFt in size. And one issue we have run into is that when the propane runs out we sometimes don't notice it until just about everything is defrosted and warmed up. Not a very healthy or efficient way of keeping food cool and fresh. The other problem is the cost of propane is prohibitive! Right now based on my usage tracking and cost analysis we are spending about $200.00 a month in propane for refrigeration, heating water, cooking and space heating. Now that may not seem like a lot to you... but to me, it's too much especially with times being tight the way they are.

      I figured out that with the DC refrigeration and water heating we will see a pay-back on our investment in about 28 months. Now that may seem too long. But in the world of cost efficiency it's not, especially when you look at the fact that the payback time is when the system will have paid for itself in propane sales not made. After the payback period you are ahead. And since the solar panels I have opted for are rated with a 12-18 year life expectancy I will get far more production out of them than my payback. Next the wind turbine is rated to survive about 5 years, again I will see over 2 years of production AFTER payback has been made. And the life span is theoretical, it could be longer or it could be shorter (which means it will take longer to see my payback).

      Next the batteries I have selected are also rated for about 5-7 years, but with the fact I am always on top of my battery maintenance and the fact that with the combined sources of power, the batteries will rarely be driven past 70% which translates to longer life spans. There are two families close to where I live that are using the same batteries I will be using and they have both exceeded the life expectancy of the batteries by 1 year and 19 months respectively. So again, the payback is well worth it.

      Okay now the home made refrigeration unit. So talking with my HVAC mechanic I will have to look at the current compressor in my refrigerator and see what the BTU rating is on the existing AC compressor then match that to a comparable 24VDC compressor. Right now we are looking at a Dan Foss BD350GH model 24VDC compressor. We believe I should be able to use the existing condenser and evaporator so that will save me some $$$ right there. I will have to get 24VDC fans for cooling as well as a 24VDC LED for the interior of the fridge. I can use existing extra wood and insulation we have on our property to increase the outside insulation aspect of the refrigerator. This is crucial as it will increase the efficiency of the system over all and prevent excessive run times on the compressor.

      Hopefully in my next post I will have the final fridge design and components list available for anyone that reads this. Peace, Love and Led Zeppelin!

Monday, February 27, 2012

A visual of my "practice" system!

      Okay, so I mentioned earlier that I was going to post up some images of my current system with more data and information. Well I finally got off my ass this weekend and took the required photos.

      Now to reiterate this is a simple system not meant for a full blown home. I designed it for our cabin one so we could have lights and entertainment, but also so I could apply what I have been reading about solar in a practical manner.

      I think the first thing I need to do is one more time list all the various components I have for both production and load so as to give a more clear image of what the system I have is doing and to help you the reader understand the power production use terms in relation to physical objects.

On the production side we have:

  • 3 : Chicago Electric 45W solar kits
  • 1 : Sunsaver 20A 12V charge controller
  • 2 : Xtreme 12V – 105AH Marine deep cycle batteries
  • 1 : TM-2025RV Trimetric meter with enclosure
  • 1 : 500A, 50mv shunt
  • 1 : Schumacher 15A 12V battery charger
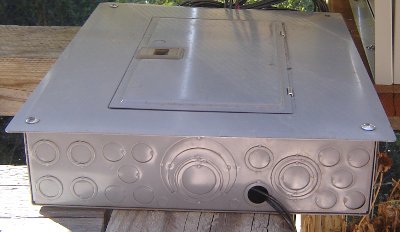
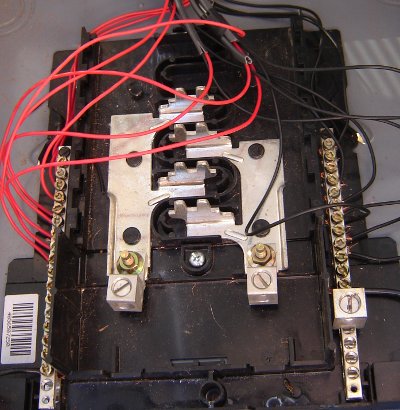
  • 1 : Custom combiner box (I took an old breaker box I had and used it).
  • 1 : 5kW Honda gasoline generator

On the load side we have:
  • 1 : 40” Sony Bravia LCD tv
  • 1 : Sony Bravia 500W home theater with 5.1 surround
  • 1 : Thinkpad T61 laptop
  • 6 : 5W 12VDC CFL lights
  • 1 : TM-2025RV Trimetric meter with enclosure
  • 1 : Droid phone (wifes)

      On the load side you are probably wondering why the Trimetric meter enclosure is on the list. It's simple, the meter has a constant draw for the display. The amount is tiny (less than .5A) but it's cumulative and needs to be accounted for. So now you have the “picture” of both production and load, let's look at the images and break down what each image means.

      First we start with several images of the Trimetric meter. I have taken 3 photos showing the three most important features that are used daily. There are several other features I can cover if someone asks.

Displaying Volts During Solar Charge

Showing Amps During Solar Charge
Showing Battery Capacity in %age
       Okay the three images above are pretty self explanatory, this is the Trimetric meter and essentially you can think of it as a "Gas Gage" for your battery array. When I took these photos sun light was at the 1030 phase of it's winter angle. During the same day I noticed a peak of 8.4A production. Again this is important as those amps translate to watts. Also the production is from 9 very inexpensive amorphous solar panels. If I had 9 of the more expensive polycrystaline panels I would be seeing somewhere around 25-30A peak production, depending on many factors but we'll cover that much later in the blog.

Left view of solar panels on balcony

Right view of solar panels on balcony
      Okay here you can see the 9 amorphous solar panels I have set up on the balcony of our cabin. In the right one you can see the home made combiner box in the shadow. And that leads to the next image!
External view of combiner box

Internal wiring of combiner box

Chevy cat inspecting my work... he says it's a go!
      Okay so more information here, essentially I had an old circuit breaker box with the connecting points in storage. It was originally supposed to be used on our house that we are still building but it seems that it's no longer CA code compliant so I re-purposed it for my solar project. Contrary to popular myth you don't have to buy a combiner box, you can make your own by using simple components that are readily available. Many of the items I have access to are reclaimed from older homes or donations through folks that tear homes down for remodeling and such.

      Anyhow the combiner box isn't really needed in most cases, but it's a great way to simplify your wiring and to keep things clean. It also cuts down on the amount of wiring you need. In simple terms I have 18 wires that I need to route from the panels to the charge controller. While I don't have a lot of distance in this application, it still made for a mess of wires leading from the panels to the charge controllers, it also meant I had to purchase more wire than I really needed.

      With a combiner box you only need two wires for your long run from the panels to the charge controller. If you place it correctly then you can minimize the amount of wire needed to connect your solar panels to your charge controller. In large solar array applications I have seen people use several small combiner boxes that all fed into a master box. This allowed them the ability to isolate banks of panels from production for maintenance, repairs or if they are over producing (common in summer months due to longer charge times) they can reduce their systems production by isolating sections of their panels electrically. I'll cover this in more detail later in the blog.

500A / 50MV SHUNT
500A / 50MV SHUNT with more wire detail and batteries in back
        This shunt pictured above is required for the Trimetric meter system to operate. It essentially prevents the meter from burning up. The wires on the bottom are positive leads and the one on time is a negative lead. I don't have the wiring schematic memorized or with me, but it's pretty simple really and the shunt does come with instructions.
12V 800W inverter purchased at O'Reilly's Automotive
 

      The inverter you see here has only one load cable plugged in and that is strung to the inside of the cabin and connected to a surge protected power strip. Plugged into the power strip is my TV/DVD system, my laptop and my wifes cell phone. The cool thing is we can control the inverter from inside the cabin. And here is how! The positive and negative power leads that connect the inverter to the battery are 8GA wire and they are direct connected to the battery (or maybe it's the shunt... can't remember I will have to update this part later). This provides the current needed for the inverter to function.

       Now here's where I got "smart" and set it up so I could turn the inverter on or off from inside the cabin. These units are sealed and use solid state switching for the on/off power button. So tapping into that wiring was beyond not only my skill set but my motivation as well. So what I did is I took some 8GA wire I have and cut the hot lead (red for positive) and spliced it into a 15A circuit breaker. So the circuit breaker acts as the on off switch as well as provides protection in the event of a freak surge. The main power button is left depressed in the on position so when it's time to fire up the TV, we flip the break to on and viola! Power is completed to the hot side of the inverter and it's turned on.

      We have been running this way for some time now and other than the normal wear and tear on the inverter cooling fans (it wasn't designed for the load cycles we are putting it through) making some noise, it's been flawless in it's performance.

Sunsaver 12V / 20A solar charge controller
Schumacher 120V to 12V / 15A charger on left
      The SunSaver 20 is a replacement charge controller for the 3 charge controllers that came with the Chicago Electric 45W solar kits I am using. The kit controllers worked but were not as efficient as the SunSaver is and they were limited in amp handling capacity so I had to have all three in the battery box and that took up space. Also the SunSaver is designed to assist with maintenance of your batteries. One other bonus with it's 20A capacity I can easily add more panels. All I have to do is mount the new panels then run the leads to the combiner box and viola! More charge capacity! Now I still have one of the original charge controllers in the battery box, but it's now relegated to lighting power provision. You can see it to the right of the SunSaver charge controller behind the inverter.

      As you can see by the SunSaver charge controller the wiring is very simple. Two wires from the solar panels via the combiner box, two wires from the batter and two load wires. The load wires are to an additional set of 5 watt lights I have outside the cabin for night illumination.
5W 12V CFL light from solar kit
My 40" Sony Bravia TV and 500W home theater
       So now we are at the load side. The lights (we have 5 of 6 installed in the cabin and outside) are direct connect to the battery. There is no need for inversion so no loss of power. I will be replacing these lights with LED's this coming pay-day. The outside lights will be upgraded to LED flood lights with only a small power consumption increase.

http://www.led-cfl-lighthouse.com/page/423801738

      This flood light above is one of the replacement lights I will be getting. Keep in mind right now the CFL's are rated at 5W and the flood lamp in the link is rated at 4.5W. I will get more lumens per watt as well as better quality lighting and more lighting for outdoors. This is also my foray into 12/24VDC lighting. And it's important I get some experience with this as the house will have 24VDC LED lighting.

       The TV/DVD have been performing flawlessly and with the two 105AH batteries in series (that gives me 210AH) we have been able to consistently run them for up to 6 hours without a problem on recharge. The only times as I noted in an earlier post, we have issues with charging is during cloudy days. But even then if we are careful we can run the system for several days before I absolutely have to start the generator.

      So there you have it, a visual of my current system. It's not as clean as I would like it BUT by the same token, it works and is very reliable. And with this system I have already made several significant changes to my plans for the larger system. And one of those changes will be the separation of inverted power and direct power. In my old design I was going to take power straight from my master battery array for lighting and refrigeration. But now after seeing how this system is performing and obtaining real world data and experience, I will be building two systems.

      The first system will be a 48VDC --> 120VAC system, that will provide the 120VAC power needed for the few appliances we need. The second system will be a 24VDC system and will be the sole source of power for lighting, refrigeration and freezer. Each system needs to be independent of the other for a variety of reasons. The biggest is the DC to AC system will be the most inefficient due to the inversion loss. Also with the location of the 48VDC system it's not practical for me to run secondary DC wiring and then step the voltage down. That adds a layer of complexity that is not needed as well as creates a potential problem with power.

      Okay, that's all for now. When I get a chance I will follow-up with the revised system configurations and how I plan to implement them. Till later! Stay free!

Tuesday, December 20, 2011

What happened to my country?!?!

      I am sitting here in my office at work (yeah... I know but I needed to get this off my chest) wondering what happened to the United States of America I grew up in? We the people are at each others throats in class warfare, entitlement mentality and a welfare nanny state of mind. Our Constitutional rights obliterated with many Americans not even batting an eye while some of us that are paying attention are asking "What the Fuck!?". The government is too large and
continues to grow and now the EPA wants to extend it's power base even MORE.

      The TSA is violating our rights and dignity all in the name of security and yet after all illegal  searches and the indignation poured upon law abiding citizens... they still have yet to catch a terrorist! Americans willingly cue up and do as they are told like good little sheeple and don't question the man! Then there is the envy of those that have worked hard to get where they are and that envy is turning ugly as people are insisting those that WORKED hard give to those that haven't lifted a fucking finger to do a damn thing for themselves.

      Men are afraid to be men and do man things... all because their wife or girlfriend or some bat shit crazy femnazi bitch says it's politically incorrect! What the fuck has happened to my country? Where are the American MEN that stand for justice, law, order and defense of the weak and infirm? When did being lazy and incompetent and irresponsible become acceptable?

      When I was growing up I learned many valuable lessons. I will now write those lessons down so you can understand WHERE I am coming from and WHY I miss the America I grew up in:

- When you point a finger at someone for your own problems, remember there are always three fingers pointing back at yourself. : My Grandmother taught me this when I was 8

- Never start a fight unless you are defending someone that is being bullied. If you can walk away from a fight, you'll be a better man in the long run. But if you can't walk away and you can't reason with your assailant then don't waste time negotiating, kick the living shit out of him so he will never forget the ass whipping you gave him. My adoptive father taught me this when I was 10.

- Your word is your contract with every man, woman and child you give it too. If you abuse it and don't keep it then your worth as a man is diminished each time till you are nothing more than a worthless piece of shit that can never be trusted. My adoptive father taught me this when I was 11.

- Tell me the truth, admit when you do something wrong and you will be disciplined accordingly. Lie about it, deny it or try to run from your responsibility and you will regret it.  My Grandmother laid this rule out for me when I was 9.

- Nobody owes you a damn thing you didn't work for. My adoptive father taught me this when I was 10.

- All you can do is your best, and if that's not good enough then maybe you need to rethink how you are doing things and learn a new way. My adoptive father taught me this when I was 12.

      When I was growing up I was held accountable for my actions and words. And I learned pretty damn quickly that infractions of the rules of home were not tolerated. At the time I hated it, but now in retrospect I am glad my  adoptive father was an asshole and my Grandmother a hard ass. They were preparing me for the world, when I would have to venture out on my own at the ripe young age of 18 (actually for me it was 17... another post later maybe...). They were setting me up to succeed and to realize that I would never get anywhere if I didn't apply myself.

      It was this upbringing that got me through 14 years in the Navy (had to get out due to injuries) and got me through some pretty tough times in my life. And yes, occasionally I had help along the way  and sometimes I would ask for it. But I always paid my debts back and with interest and I made sure that BEFORE I asked for help I exhausted every resource I had within my own self. In other words I am a self reliant man that can get along just fine. I can raise my own food, hunt and trap my own food, build my own house and provide my own clean water and power... as well as do it for my children and family. And now in today's society I am considered an "abnormality" a threat to the status quo of Metro-Sexual males and their masculine women.

      We can no longer discipline our children... they are talked to and "reasoned with". And now we are seeing the devastating effect it is having on our society. This touchy feely shit has undermined the very fabric that build this nation. Ironically I am locked in a battle with my life partner over her son. She is trying to raise him the touchy feely way only to be continually frustrated as she is not getting the results she wants. I come in with my hard ass way that I was raised with... and I get results. She doesn't like it because there is no chance for him to have his voice. To which I reply... hey, I get it and I understand how important it is for a child to be heard. BUT when you need or want something done and they KNOW they can try to reason their way out of it... they will every single time. And he loses respect for you in the process.

      She hates it... because she sees by result and action that I am right. She sees that that damn Berkeley education from those fem nazi liberal morons is bullshit. And it just irritates the shit out of her something fierce. What REALLY gets her going is when I compare her son to other boys his age... but again when she sees other 6 year olds BEHAVING in public and not running around screaming and climbing on shit and staying close to their parental units... she admits I am right in my curbing his "fun". There is a time and place for everything, and this idea that a child can willy nilly climb and raise hell in public places is ludicrous. It's disruptive to others and disrespectful as well. And slowly she sees... I am right.

      How did this happen? How did we lose our way, and don't pull that bullshit "we took god from school" card. God has nothing to do with good moral values, people just want to justify their actions through some invisible dude in the sky. Can you tell I am not a believer? Good. You want to believe, please by all means do! But god in schools or not, is not the reason this is happening.

      Oh well... this is yet one more posting that will get relegated to some dark corner of the internet, never to be read, debated or even enjoyed or scoffed at. If you read it, thanks for taking the time.

Wednesday, November 9, 2011

DIY idea!


      So I am looking to resolve my solar issues once and for all! After shopping around and finding that no matter what it’s going to cost me a lot of money, I stumbled onto this site here: DIY Solar Kit and the light bulb went on! So I started a new track of research and finally realized that I can save a ton of money and build my own custom panels!

      My large system that I have plans to build is based on a 48VDC side. But some of the problems I was running into were finding solar panels that were configured in 48V. I found one by Solar Canada, but the price is rather steep and further research showed that I can build a more powerful panel that meets my 48VDC requirement (actually it would be 49.5VDC which is optimal!) and generates an estimated 20 Watts more power per panel.

      Better yet since I already planned on building my own array platform this would allow me yet even more control over the final system. So now I am looking to buy this set-up here: More gooder DIY solar panel kit! I just need to shuffle some money around to do it. And since right now I need to increase my solar capacity, this DIY panel kit has the wattage AND amperage I need to make up the difference. Toss in a 10A charge controller and done! I have a bunch of wire at home so this would be easy to set up.

      And I also learned how to make my own combiner box for a couple dollars. So will definitely be doing that soon! Okay, that’s all for now, I have to bolt soon!

Tuesday, November 8, 2011

Okay... so cloudy days, they suck worse than you think!

      Okay! So cloudy days really suck for amorphous solar panels! The peak amps I saw were about 3.2 and not for very long. The average was just over 1.4A. So the realization that I will need more powerful and efficient panels hit home hard. Not to worry though it's all part of my learning experience. With full winter sunlight at peak I will see 6.1A from the current set-up I have (photos are still coming) and average of 4.6A.

      So I am looking at these systems here as an augment to what I have in place now:

170W System from Lowes - This is most likely the one I will get... when I have the $$$.
260W System from Lowes

      So going back to what I said about matching your capacity to your load... guess I need to take my own advice! LOL!!! Anyhow this brings up another interesting element that needs to be covered eventually... so why not now?

      Solar panels... holy crap! There are hundreds of them to choose from and they are of differing compositions! Which one to get? What wattage to get? It's enough to really drive you bonkers! So I will start  by defining the types of panels available and what the pros and cons are.


      From my research I have found that there are four main types of solar panels that you can currently purchase. They are Monocrystalline, Polycrystalline, String Ribbon, and Amorphous.

Monocrystalline Silicon Panels - Monocrystalline (or single-crystal) silicon solar panels are around 14% to 18% efficient. They are made from a single continuous sheet of silicon that has pieces of metal connected to the edges so as to increase conductivity and to assist with the excitation of electrons.

These panels are the more expensive of the panel types you can buy but they are also more effective, so in the long run these are the best bet for a good ROI.

Polycrystalline Silicon Panels - Polycrystalline (or multi-crystal) silicon solar panels are about 12%-14% efficient. Essentially these are a lot of individual photo voltaic cells grouped together that also use metal conducting materials connected to the sides so as to help with electron excitation as well as connect the individual cells together.

Polycrystalline panels are the most cost effective to produce as well as the most cost effective. An added benefit is that if one of the cells on a polycrystalline panel is damaged then you can replace the individual cell instead of the entire panel. This is one selling point of polycrystalline over monocrystaline panels.

String Ribbon Silicon Panels – String ribbon silicon panels are constructed similarly to the polycrystalline silicon panels and have generally have about the same level of efficiency The fundamental difference between string ribbon and polycrystalline is the photo voltaic cells in a string ribbon panel are constructed of strips of silicon attached to metal bars that connect the strips to form a cell.

By using strips of silicon to form the cell in lieu of using a  solid square of silicon make the production cost of string ribbon panels a bit lower than the production cost of polycrystalline panels.


Amorphous Silicon Panels – Amorphous silicon panels are the least efficient of all types of solar panels. Amorphous silicon solar panels generally run about 5%-6% efficient. This is due to the panels not being manufactured from crystalline silicon. Generally they  are comprised of a semi conductive metal, such as copper, with a thin silicon film over the top that is attached to some metal connecting pieces.

These are the least expensive panels to manufacture and they are great for small short term projects. But their inefficiency does not make them a cost effective long term solution for solar applications.

      So there now you have a bit more insight to various solar panels. Again I have a base system that is using the amorphous technology, and I knew getting into it that it will be a short term set-up. I also knew that it was the least efficient. But by starting small and inexpensive I have been learning a lot about off-grid solar power.

Friday, November 4, 2011

Some of my calculations sheets...

      As I had said in another post, I would start posting my calculation sheets for people to use in their own off grid endeavors!

https://docs.google.com/spreadsheet/ccc?key=0Av2bNlufN8JodEJnMTlyTnBseE95cWd5TkVranlXVXc

      Oh... and to use the sheet any area that is bold and blue is a field you edit. The other fields will update as you make your changes. But this sheet is a critical part of planning your system out. There is more information coming later... I have to go now but check back occasionally and see the changes I make to the calculations sheet. There is a lot more I have to upload.

      Okay, I have updated my worksheet a bit more. Now there is a sheet that allows you to compare batteries for cost versus performance based on configuration. You can tweak the numbers to match the system you plan on designing. As I noted elsewhere most systems are 24 volt, I am working on implementing a 48 volt system due to it's efficiency over 24 volts.

      I have also included a rough battery charge calculator sheet. One thing you have to look at is how long will it take with your system do recharge the batteries? The goal is to have it so your panels will keep you at least up to 95% capacity. Remember once a month or so you will have to equalize your batteries anyhow, so if you can recharge without running the generator then excellent!

My current system, an experiment to learn from...


    So before I invest a lot of money and time into a full blown system, I decided to start small. And I am really glad I did! First it’s going to be a while before the house is finished so there is no real drive to have a full blown system in place. Second I don’t have the money right now for a full blown system. So it’s saving time and with a new kid on the way, the economy borked and my pay raise an insulting joke... well it’s going to be a while before I can afford all the components I will need.

    All I need is power for my TV, DVD and some simple lights. Since we have a propane refrigerator (I really hate that fucking thing!) I don’t need to run my big energy hog of a fridge. Actually my AC fridge is pretty efficient but is still takes a bit of power. As for my deep freeze, I have that over at a neighbors for the time being.

    So I looked at my load requirements and realized I can support the load so long as I am very very careful with use. And it’s been about a month now and so far so good! My TV and DVD (home theater) draw about 280Watts which converts to about 2.333A. The lights I am using draw .5A each (they came with the kits I bought). So knowing this I started to shop around and I found this:

http://www.harborfreight.com/45-watt-solar-panel-kit-90599.html

    After some rough math in my head, I determined that 3 of these kits would suffice. And so far... so good! I have 2 of these set up on the balcony of the cabin with the third kit up at the “barn”. Along with the kits I have 2 12V 105AH batteries in parallel, which gives me 210AH of capacity. We run the generator every 4-6 days so we can pump water from our well into our storage tanks so I will then run a charger to top off, equalize and float my batteries.

    The inverter is an inexpensive 12V inverter which I am estimating to be about 85-88% efficient. I say this as my Trimetric TM-2025RV battery monitor shows a draw of about 7A, and I know it’s not the TV and DVD player and lights. Having measured them independently and then validated their consumption using a Kill-A-Watt the extra draw has to be from the inverter. Either way, the solar array of 6 – 15 watt panels has been keeping my batteries pretty consistently around 95-98% charged. Although we just today had our first cloudy day so I am anxious to see how the panels performed.

    I will post some photos of my basic set up later. First I have to take the pictures of the system... anyhow I will briefly describe why I made the statement “And I am really glad I did!”. See little dumb ass... well, I am not really little but I definitely pulled a dumb ass move! I screwed up when setting the batteries up. See I tried to do it from memory. Mistake #1. While what I was doing technically was not wrong, how I did it was and the accident that happened shouldn’t have.

    I wired the batteries in series, which like I said isn’t wrong, but for my application it was. As when you wire in series you double voltage not AH which is what I wanted. What saved my ass and equipment is the fact that I connected my components to a single battery instead of across the series. What? Each battery has a positive and negative terminal, we know this. When you wire a battery in series you connect the positive terminal of one battery to the negative terminal of another and so forth. So a better way to explain this is lets say you want a 48VDC system, to keep it simple we will use 12V batteries to create it. You will need 4-12V batteries.

    You connect battery 1 positive to battery 2 negative, battery 2 positive to battery 3 negative and battery 3 positive to battery 4 negative. Now this is a series connection. But in order for the 48VDC to be realized you need to connect battery 1 negative and battery 4 positive to your inverter. If you do like I did and connect your inverter to battery 1 positive and negative... well, you just get 12V. And that was a mistake that saved me a bit of money.

    Now I almost blew myself and batteries up because I wasn’t paying attention to detail and I didn’t have any instructions with me and I was working tired. A stupid way to operate and I know this. Why I am admitting this is very simple, I hope you the reader learns from my dumb assery. Anyhow I dropped a connecting cable that essentially created a loop on the batteries... fortunately I was fast and saw (more like smelled) what happened and all that was damaged beside my ego was one of the terminal threads was melted. I checked the batteries and they all test fine with the hydrometer and volt meter.

    So some words of advice...

  • Be well rested.
  • Don’t rush, take your time and triple check your every move.
  • Read the instructions, they are there so you don’t do something stupid.
  • If you are unsure of something STOP! READ! ASK! There is no shame in asking for help.
  • Use personal protective equipment for just in case an accident does happen.
    Okay, so anyhow onto more gooder information. The system I have set up is pretty neat and as I said it’s a small starter system and I learned a ton from doing it. I can control the inverter from inside the cabin as well as the lights have switches in them now. And I can monitor the entire system from inside the cabin as well. Now this may not seem like a big deal but when you see how it’s set up (and I will describe it in just a minute) it is.

    The current system consists of the following components:

  • Sony home theater
  • Sony 40” TV
  • Three 5W 12V CFL lights (there are actually 6 available but I am only using three in the cabin) all with inline rocker switches installed.
  • 800W 12V DC-AC inverter
  • 15A battery charger (it’s a multi-stage charger and will perform all the battery maintenance I need)
  • Trimetric TM-2025RV battery monitor with a 500-50 shunt
  • 3 – 45W solar panel kits from Harbor Freight(these kits come with a charge controller, lights and panels) (2 are used on the cabin and the third on the "barn" which is a small office with a laptop and printer and 2 - 12V 5W lights)
  • Extra wire for the lights
  • CAT5 for the Trimetric monitor
  • 20A circuit breaker
  • 8ft of 8GA wire
  • Battery interconnect wires
  • 1 – 15W trickle charge solar panel
  • 2 – 12V 105AH deep cycle batteries
    How it’s all connected is simple. The two batteries are wired in parallel which keeps my voltage at 12V and doubles the AH to 210AH capacity. This is an important design feature I wanted so I could run for a couple of days with minimal charge from the panels. Since I don’t allow my batteries to go below 50% I needed the capacity to allow this. Watching 1 movie for say 2.5hrs and running 1 light for 3-5 hour my consumption is about 18.4AH a day use. This gives me about 5 days with no charge coming in on the batteries (that’s the theory but reality is always different).

    Now don’t assume I allow the batteries to be drained down so far on a regular basis. Actually with the solar panels in place and our usage I am finding the batteries are never getting below 70% and they are generally recharged to 95-98% capacity with just the solar panels I have set up. I verify this with hydrometer reads, voltage read with a volt meter and my Trimetric monitor (which was a damn good investment!) Anyhow I have a metal box on the balcony of the cabin where my batteries and components are all kept. This is so I can keep the off gassing from inside and to also keep the noisy ass inverter outside.

    So I then punched two holes in the back of the box and through the cabin walls so I could run the lights and power for the inverter into the cabin. These were later sealed up once the wires were run through them. We get some real nasty weather up on the mountain where we live and the last thing I want to do in the evening is go outside to turn off lights and inverters after watching a good movie. How the inverter is connected is I cut the hot side of the battery cable and ran it through a 20A circuit breaker (yes I know... it’s not a “proper” switch, but it works AND I have the added protection of a breaker in place!) and the main power button is left on. Then the inverter is left connected to the batteries with its main power switch in the on position. When the circuit breaker is tripped or open, no power to the inverter. When it’s reset or closed, power to the inverter and I can then run my TV and home theater!

    Now the lights that came with the solar panel kit don’t have any kind of switching and rely on you either plugging them into the charge controller or unplugging them. So I used a simple inline rocker switch so I could keep them plugged in yet control their state from inside the cabin. I also had to run some extension wires as the existing leads were insufficient to reach where I wanted to in the cabin.

    So we have power on the property now... not the full system I have designed and in planning but it’s a start and I am learning and have learned a great deal about living off grid. It’s not as easy as many make it out to be and you have to sacrifice some conveniences. But if you are like me, it’s well worth it. Life is a bit more simple in many ways and a bit more complex in others.

    Until next chance I have to write... C U L8R!